Getting Started Editing Weddings in Lightroom Mobile
What do I Need to Get Started?
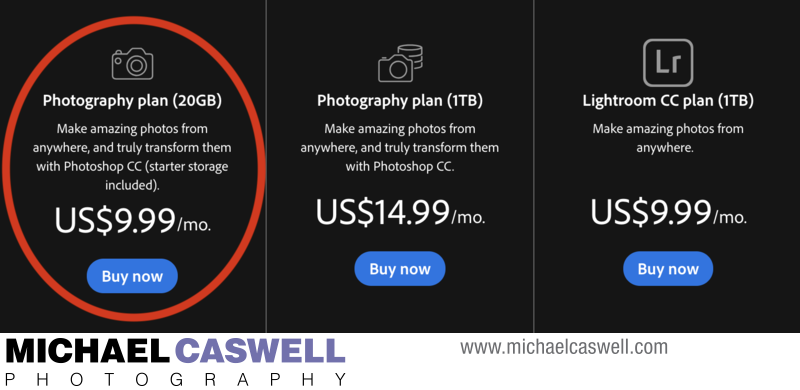
First let’s talk software – you need an Adobe Creative Cloud Photography Plan if you don’t already have it, which also gives you access to syncing your images to Adobe's Lightroom Mobile apps. There is a bit of potential confusion here, because the naming (and identical pricing) of two of the available plans can lead you to purchase the wrong thing. I advise you to subscribe to the “Photography Plan (20GB)”, not the “Lightroom CC Plan (1TB)”. The latter does not include Photoshop (which, though not directly related to editing image in Lightroom on the iPad, you will likely want to have access to), and it also includes only the Lightroom CC desktop app, not Lightroom Classic (which is the more suitable app for this type of workflow).
Confused yet? Let me back up for a moment. Presumably for marketing reasons, in late 2017 Adobe decided to take the name of the well-established Lightroom that we had all used for years, and reassign it to a completely new piece of photo editing software (rather than come up with some new name for this new app), which led to much confusion among both new and existing users. This new app (now called Lightroom or Lightroom CC, also referred to as LR CC in this series of articles) is Adobe’s “cloud-centric” editing app which functions under the assumption that you want the full RAW files of all of your photographs synced to the cloud. This would be fine for a hobbyist (or a professional with a relatively small volume of photos) but in my experience, this would make storage and organization too cumbersome for the high numbers of images that professional wedding photographers typically capture.
The original Lightroom we all know and love was renamed Lightroom Classic CC (hereinafter referred to as LR Classic), and is the “desktop-centric” editing app. I'm personally not fond of the name choice here, as "classic" somewhat implies that this is an outdated piece of software that is no longer being actively developed and updated, which is far from the truth... groundbreaking and useful features are still regularly added. This is the app I suggest you use for this workflow.
But wait, if I am editing with the iPad synced through Creative Cloud, don’t I need the “cloud-centric” LR CC? No. LR Classic works just fine for this, which I’ll elaborate on in a bit. The Adobe Photography Plan does include access to both LR Classic and LR CC, but again, the Lightroom CC plan does not give you access to LR Classic or Photoshop, only LR CC (and a few secondary apps).
With that settled, let's move on to storage. You’ll notice that for the Photography Plan, there is a 20GB and a 1TB option for storage, but unless you need the added cloud space for some other purpose, 20GB will be perfectly fine for this workflow, no matter how high your shooting volume is. Why? Rather than full RAW files, LR Classic syncs only Smart Previews to the server. Smart Previews are basically downsampled DNG (RAW) files that are generated in the background and serve as proxies for your original images for the purposes of more streamlined editing on mobile devices. So when you make edits on the iPad, you are actually seeing the Smart Preview, but then the information about the changes you've made are synced to the cloud and back down to your computer, where they are applied identically to the originals.
At the time of this writing, Adobe does not count synced Smart Previews against your storage quota. In other words, it doesn't matter how many images you have synced to the server, the storage usage would still be reported as zero. Even if Adobe eventually changes this policy and starts counting the storage of Smart Previews as part of your allotment, you quite possibly still won't need more than 20GB, since that's enough for approximately 10,000 images (which, for me, would likely be enough space for the number of weddings and portrait sessions I need to have synced to the cloud at any given time).
Now, one possible exception to the above recommendation of choosing the 20GB plan over 1TB (or more). If, rather than using Smart Previews for iPad editing you would prefer the full RAW (or DNG) files to be synced to the cloud, you'll obviously need a lot more storage space. LR Classic is only able to upload Smart Previews, so if you want to go this route, you'll need to incorporate the LR CC app into your workflow (either in addition to, or instead of LR Classic), but I have no direct experience with this.
But keep in mind, syncing the full RAW files for every event will take a considerably longer amount of time and will consume much more bandwidth compared to Smart Previews, so unless you have an extremely fast fiber/gigabit internet service with unlimited bandwidth, this will likely complicate the simple, fast, and efficient mobile editing that Smart Previews-based workflow offers. So weigh this choice carefully before you commit to it.
Note, for a brief period of time around April/May 2019, the 20TB Photography Plan disappeared from the Adobe website, leaving only the 1TB Photography Plan (and the less desirable Lightroom CC Plan). It was said to still be available for purchase, but you had to jump through some hoops to do so. After an outcry from the photographer community Adobe subsequently added the 20GB Photography Plan back as a clearly available option, and stated that its removal had just been a temporary marketing test (presumably to see how its removal would affect new sign-ups, but possibly also to gauge reaction from current subscribers).
Hardware
I recommend an iPad Pro, mainly for color accuracy, as these models are reportedly factory profiled for accurate color representation. In my evaluations of the various models in recent years, I’ve found the original iPad Pro 9.7” and the subsequently released 10.5” (both with TouchID), along with the 11” and 12.9” FaceID models from 2018 and 2020 and the 11" released in 2021 to all have a near-perfect match to my color-calibrated MacBook Pro screen, though I was not as impressed by the color accuracy of the original 12.9" model (the one with TouchID), though this could have possibly just been an anomaly with the unit that was on display at the store.
I have not yet evaluated the 2021 iPad Pro 12.9". Although the 11" 2021 model has a display that is unchanged from the 2018 and 2020 models, the 2021 12.9" model features a new type of display technology that could possibly show some color rendering differences, though iPad Pros are all reportedly color-calibrated at the factory.
If you're on a tighter budget, you may be able to get by with a regular iPad or iPad Air. When I tested the 9.7" model released in March of 2018, I found it had a reasonably accurate screen, as did the new 10.2" model released in 2019, but older iPad models had displays that were noticeably too cool in color temperature (which, if used for color correction, would lead you to adjust the white balance on images to be a bit too warm). I discovered that this could be partially compensated-for by enabling the iOS Night Shift feature and tweaking the control a bit, which would make the display slightly warmer and ok for rough adjustments, but still not really accurate enough for editing wedding photographs. However, when I tested the March 2018 iPad, I discovered that its display color was much closer to the iPad Pro, so that model could be a more affordable option. I have not evaluated the 2019 iPad Air 10.5" nor the 2020 iPad Air 10.9".
No matter which one you decide on, be sure to buy it from a store with a favorable return policy, so that you can evaluate it thoroughly to ensure it will meet your needs.
Even though a regular iPad or iPad Air may suffice, I would still suggest going with the iPad Pro if you plan on doing a significant amount of your editing work on this platform, as the more precise color representation and the increased screen size are beneficial features, and the faster speed is nice as well for certain functions, such as the new AI-based masking tools (select subject and select sky).
The two sizes (three, if you can find the older but still perfectly capable 10.5" model from 2017) currently available let you apply your own requirements in terms of budget and portability. After using the 9.7" and 10.5", I moved to the larger 12.9" in 2019, and although the increased screen size was nice to have, I eventually shifted back down to the 11", as I found the weight of the larger model a bit too uncomfortable to hold for extended periods, and ergonomically the smaller size worked better for me in the situations I used the iPad in the most.
But if you go with the 12.9", one nice thing you'll find is that Adobe's programmers didn't simply scale up the entire app for this larger screen – the user interface elements (sliders, buttons, and other controls) are actually about the same size that they are on smaller iPads, so all of that increased screen real estate gets devoted to displaying your images larger.
LR Mobile is available for Android tablets as well, but I have no direct knowledge or experience as to how reliable the color representation of these various manufacturers' tablet screens would be.
For storage size, if you are primarily or exclusively using the device for the type of editing discussed in this article (as well as other basic business and personal tasks like web browsing, email, YouTube, word processing and spreadsheets, and other office stuff), 128GB is fine. Only 128GB? Yes. As mentioned above, you will not be storing the full RAW files on the iPad, only Smart Previews (unless you go route of syncing full RAW files to the cloud). While a 128GB iPad might struggle to store even a single wedding’s worth of full RAW files, it’s plenty for Smart Previews. As a rough guide, expect Smart Previews for every 1000 images to consume about 2GB of storage space on the iPad, which, assuming you do have some other apps and stuff on your iPad, should give you ample space to have the device loaded with at least a dozen weddings (or several dozen portrait sessions) at a time.
And honestly, though 128GB is now the minimum size sold, if you find a good deal on an older 64GB model, that will work fine too. My previous 12.9" iPad Pro was 64GB, and I found this sufficient for, in addition to keeping a good number of weddings and portrait sessions loaded, having a portfolio of images and album designs (via a different app that is specifically designed for this purpose, rather than through Lightroom) to display during client meetings.
On the other hand, if you want to also use the iPad for storage-intensive purposes such as loading it up with movies to watch while traveling, then consider 256GB or 512GB. If you want to try to implement a workflow that consists of loading full RAW files directly onto the iPad (briefly mentioned earlier, but not the topic of this article), you'll likely need 512GB, or possibly even the newly available 1-2TB capacities.
If you’re new to the iPad and are not sure how extensive your usage will be, 256GB represents a good balance between ensuring you will not be drastically short on space to work with, without overpaying for excessive (and expensive) storage that you may never use.
Apple Pencil
In mid-2024, I started using an Apple Pencil with my iPad Pro. While I wouldn't say it's a must-have, it does make editing easier, especially when drawing masks with the Brush local adjustment tool. You can paint these masks more quickly and precisely, plus not have your finger block so much of the image as you're doing so. And a double-tap of the Pencil (or a squeeze, with the newer Pencil Pro) switches to the Eraser to refine the mask.
Similarly, the Remove / Heal / Clone tool benefits greatly from the Apple Pencil, allowing you to precisely deploy these tools on small elements, without your fingers blocking the view and preventing you from applying the tool to the right spot.
Workflow
Here’s a general overview of the workflow:
- Ingest / import your images into LR Classic (like you normally do if you are already a Lightroom Classic user)
- Create a “Collection” for that folder of images, designated to sync to the cloud (this is not as complicated/scary as it sounds)
- Smart Previews are automatically generated and uploaded to the server, and the thumbnails will appear as Albums in Lightroom Mobile on your mobile device(s) that are logged into your Creative Cloud account
- From this point on, any edits to those images made on the computer will automatically sync within a few seconds to the cloud and then down to your mobile device(s), and vice versa for any edits made on the mobile device(s)
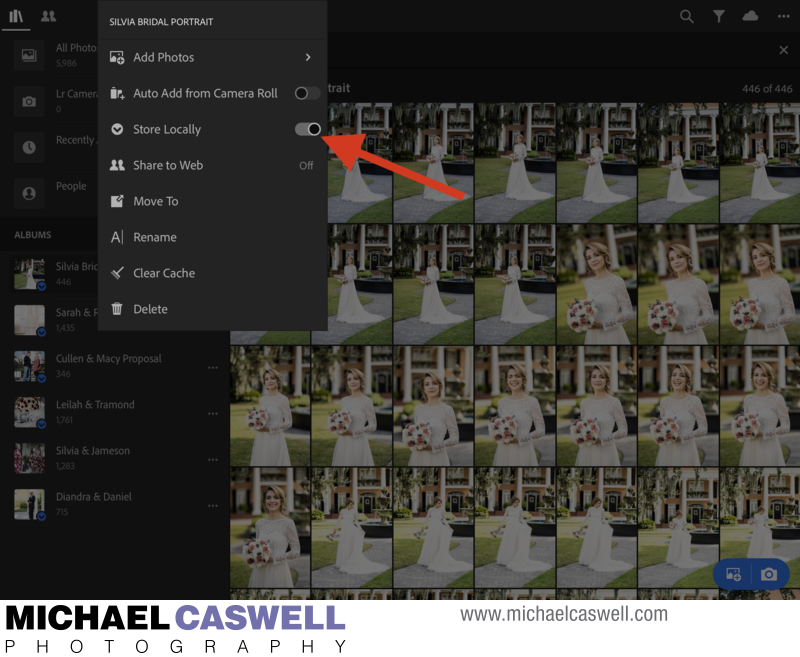
- Optional but highly recommended – on the iPad, enable “Store Locally” for the Album (otherwise you won’t be able to edit when away from internet connectivity)
- When you are finished editing, after confirming that syncing is complete, you can delete the Collection for that job, which will remove it from the cloud and from the mobile device(s), but will not remove it from the computer
- Follow your usual post-editing procedure (rename images sequentially, export JPEGs, upload to gallery, etc.)
A Single Catalog File is Required
One caveat to this workflow is that you must use just one catalog file. There are some Lightroom users who advocate creating separate catalog files for every event and portrait session. Similarly, some photographers like to have multiple catalog files based on job dates – for instance, creating a separate catalog file for each month, or perhaps one catalog file for the whole year. If this is the case with you, you’ll need to change that practice to use the Lightroom Mobile workflow efficiently. The reason is that Creative Cloud will only allow one LR Classic catalog file to be designated as being able to sync to the cloud, and changing this designation every time you open a different catalog file will quickly become cumbersome and confusing, defeating the whole purpose.
For those who like to keep their RAW files indefinitely, but don’t want the catalog file to grow too large, my suggestion is to, after the editing of the job is finished, and JPEGs have been exported and delivered (and thus the RAW files are no longer needed to be regularly accessed), use the “Export as Catalog” option in LR Classic to offload the images onto a secondary external hard drive for offline storage, at least for a while (until you are confident they are no longer needed). You can then delete them from your the main working catalog.
I have maintained a single catalog file for as long as I've been using Lightroom (over 15 years now), constantly adding and removing folders along the way as I shoot new weddings and portraits and finish the editing of previous ones, and I can't recall ever having any problems with the catalog file. I do have Lightroom set to automatically optimize the catalog upon quitting, and I also make frequent backups to multiple locations, just in case.
The Details
(Note: the apps have had several updates since these screen shots were captured, so the appearance of some UI elements may be different, but the general concepts are still the same.)
This assumes that you are already familiar with LR Classic and have it up and running, with a single catalog file set up and loaded with images, and that you’ve installed the Lightroom Mobile for iPad app on your iPad (and signed into your Creative Cloud account).
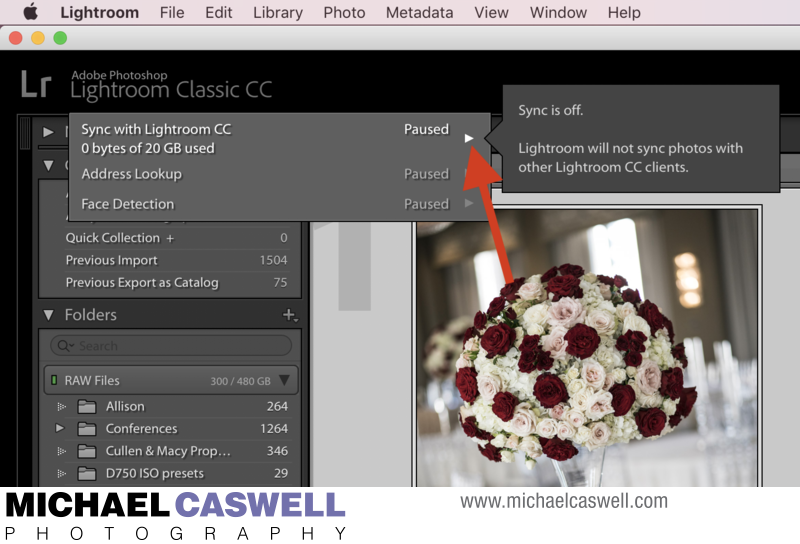
Open LR Classic. Ensure that syncing is enabled by clicking on the app name / status bar area in the upper left of the window, and clicking the play button if it says Paused.
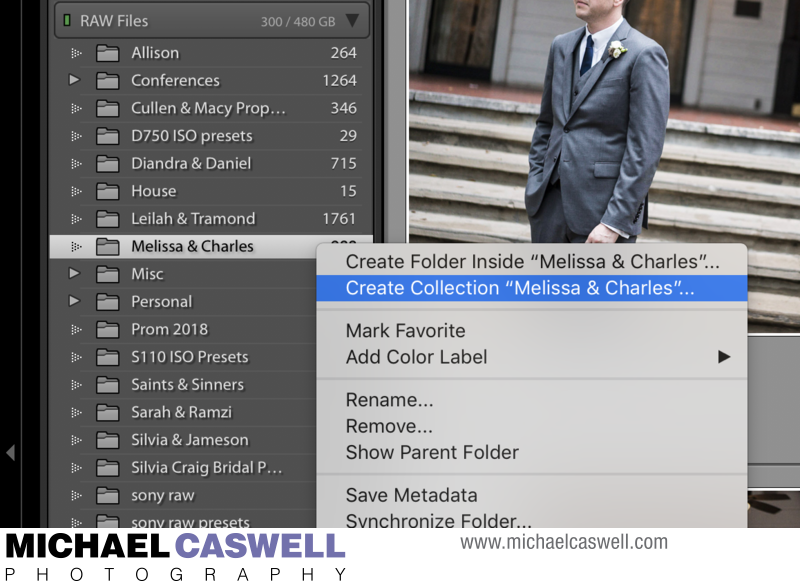
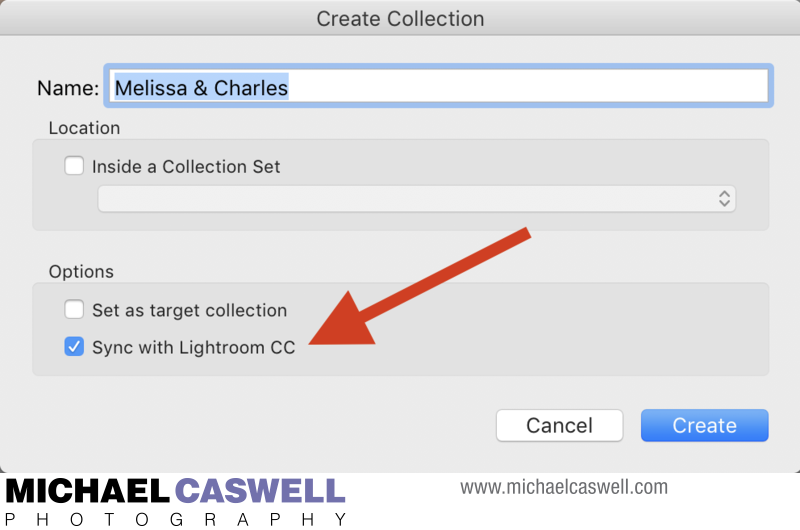
In the Library module, control/right-click the folder you want to sync with Creative Cloud, and select Create Collection.
LR Classic will generate the necessary Smart Previews and upload them to the cloud, a process which may take 10-20 minutes or so (maybe more) depending on the number of images to be processed, your computer speed, and your upstream internet connection bandwidth.
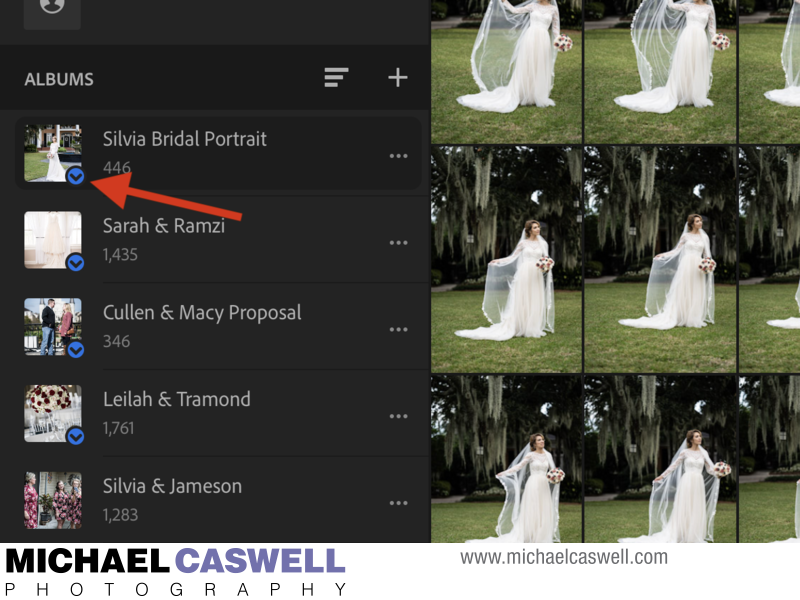
Meanwhile, if you open LR Mobile on the iPad, you’ll see those images start to appear in an Album with the same name as the Collection you created.
Important: by default, only thumbnails will be downloaded and stored on the iPad initially, with the Smart Previews (which are required in order to make edits) being retrieved from the server on an as-needed basis as you swipe through the images. What this means is that if you at that moment grab your iPad and head off somewhere to work where there is no WiFi available, you’ll find you will not actually be able to edit, because LR Mobile will not be able to download the required Smart Previews.
If your iPad is a cellular model, or if your iPhone carrier plan allows for tethering, you can of course sync edits and download Smart Previews while away from WiFi in a pinch, but just be aware that this may result in excessive mobile data usage, so use with caution. And if cellular connectivity is poor in the area where you are working, it could be painfully slow having to wait for each image to load.
A far better solution is an option on each Album of images on the iPad called Store Locally (it must be enabled for each Collection you add... there's no way to set it to be the default). I suggest that you make it a standard part of your workflow to always enable this, at least for the next couple of weddings and portraits in line to be worked on. That way, the iPad will always be loaded and ready to go. Do this by tapping on the three-dot icon next to the Album name, and activating the switch next to Store Locally. After notifying you about the amount of data that will be downloaded, a progress bar will appear, indicating how many images remain. For best results, leave the iPad on with LR Mobile open in the foreground until this process is complete, as while the app seems to be capable of syncing Album updates in the background, in my experience it will pause the downloading of Smart Previews if you switch to another app or put the iPad to sleep. Note, you can’t just turn this on as you’re walking out the door, as it may take a little while for the download to finish.
Downloading the Smart Previews in advance in this manner also speeds up editing even when you're on WiFi, since this image data does not need to be downloaded each time you swipe to the next photo.
Even if with Store Locally enabled, it's also a good idea if you're leaving the house or office and need to edit away from WiFi, to open LR Mobile and ensure everything is synced up if you've previously been doing some editing on the computer. In other words, if you've made some edits to a series of images on the computer, those changes might not have had a chance to sync down to the iPad yet. Syncing does appear to sometimes take place in the background, but just to be on the safe side, open the app and give it a few minutes to sync.
Also important: make sure the Night Shift and True Tone features on the iPad are both off. Night Shift changes the display to a warmer white balance at night time to reportedly reduce eye strain and to help you get to sleep easier, while True Tone constantly monitors the color of the ambient light around you and changes the white balance of display as needed to match it. While these features are useful for general iPad use like reading, emailing, and web browsing, obviously you cannot make accurate color corrections to images when the white balance of your display is not consistent and/or is dramatically warmer than normal.

Turning both of these off will keep the white balance of your iPad's display unchanged. These settings can also be accessed from the iOS Control Center by long-touching on the Brightness slider.
Set your iPad's Brightness at halfway as a starting point, for editing in a typical residential room lighting. While I've found the iPad Pro to have very good color accuracy at this setting, you may need to increase or decrease the brightness to compensate for the amount of ambient light where you are working.
Editing, and Finishing Up
As you edit, the metadata representing your changes will be uploaded to the cloud server, and then will be available to other signed-in devices on your account, including Lightroom Classic (if it's open) on the main computer. In some cases, mobile devices will receive these updates in the background, but if you are about to head out of the house with the iPad, it's a good idea to open LR Mobile briefly before leaving to ensure it is synced up (tap the cloud icon in the upper right to check the status).
When you have finished editing a job, first ensure that any edits made on other devices have finished syncing to LR Classic. If you have not left the LR Classic app open on the computer, launch it and let it sync the changes from the server. To be certain that syncing is complete, I change the star rating of the final image in LR Mobile, which enables me to confirm at a glance in LR Classic that this latest change has indeed been synced.
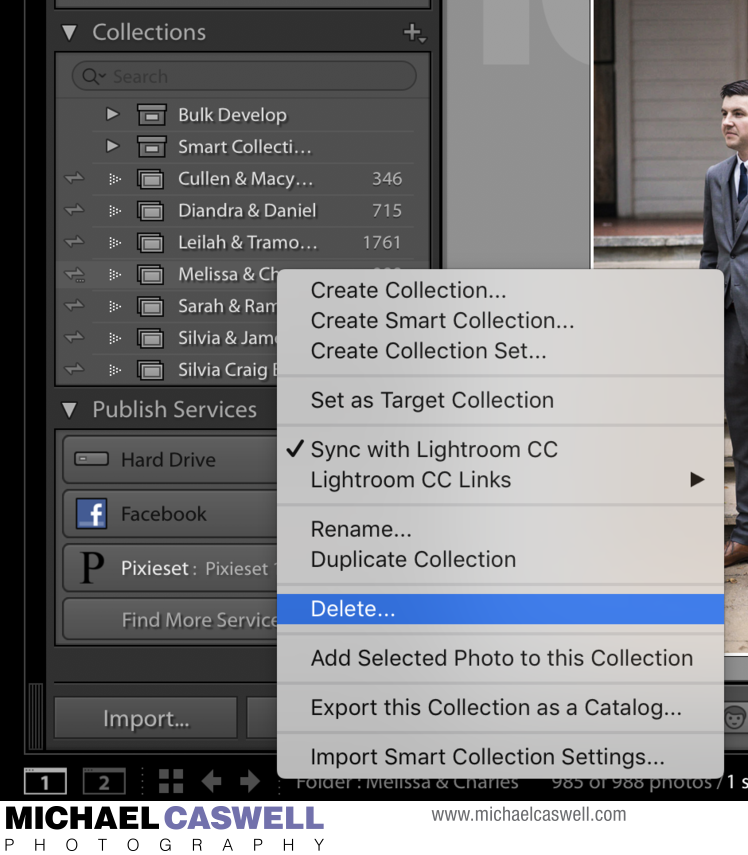
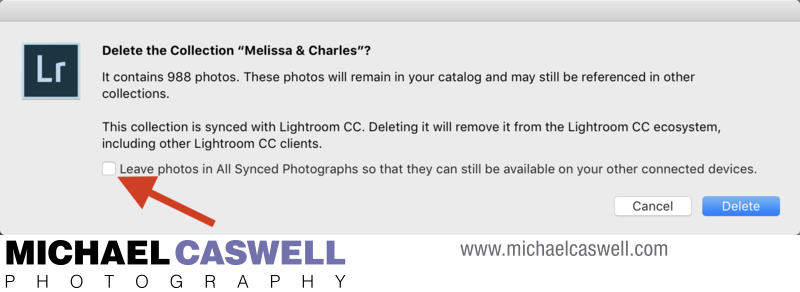
Presumably at this point, you will no longer need access to that job in LR Mobile (since editing is complete). In LR Classic, right/control-click on the Collection name and select Delete, which will remove them from the cloud server as well as from your iPad and other devices (don't worry, the folder of images will remain in LR Classic until you specifically remove it... you are only deleting the Collection here). Then simply follow your usual post-editing workflow procedures of renaming the images, exporting JPEGs, creating and uploading galleries, etc.
The next section explores some tips for working in Lightroom Mobile.